
As we have covered in previous blog posts cyanotype photography is an alternative form of creating photographic images. Two chemicals are mixed together creating a photosensitive solution which can be used to coat paper or fabric. This solution is allowed to dry in darkness as it is sensitive to UV light. Once dry it's ready for use and it can be exposed. In this project I'll walk you through the whole process from coating the paper to creating a framed print.
Equipment
Potassium Ferricyanide
Ferric Ammonium Citrate
Teabag paper
Sponge brush
Leaves
A piece of glass as big as the piece of paper
3 inch embroidery hoop
Ribbon
UV bed or sunlight
Craft knife
Old plastic pot
2 Glass bottles
Rubber glove
Step1

Look at the cyanotype chemical containers. I use the powder and crystal forms and mix up the solutions according to the container instructions. I store them separately in well washed out glass bottles well labelled as they look quite similaronce mixed. They need storing in the dark in this form to protect their effectiveness.
Step 2

Wearing a rubber glove I use a bottle top to measure out equal parts of the solutions and mix in an old plastic pot. In a place where there isn't much UV light, a dim room or at night by artificial light coat the teabag paper. Using a sponge brush will ensure a more uniform coating of the chemicals. Store in a dark place until needed.
Step 3
Once the paper is dry it can be used to make a photograph. You will need a sunny day or you can use a UV bed (I show you how to make one in a previous blog post). I used a UV bed for this project.

Lay the paper on a flat surface, place your leaves on top in a design you find pleasing. Bear in mind that wherever the leaves touch the paper they will stop the UV from penetrating and will leave the chemicals unreacted beneath. Cover with a sheet of glass to hold everything flush to the paper. In my case I made a wet cyanotype so I gave it a misting of water before adding the glass. A dry cyanotype is uniform in colour, a dark blue once rinsed whereas a wet cyanotype is less predictable and a lighter blue in areas.
Step 4
I left my print for about 30 minutes in the UV bed but if you are using sunlight it's less easy to say how long it will take as it depends on the strength of the sun. It's easier to judge it by eye, a well exposed cyanotype will turn brown.

Remove the glass and leaves. If you've made a wet cyanotype you'll need to make sure it is dry before the rinsing stage, I use a hairdryer in a dim spot.

Once dry you need to fix the photograph to stop the chemicals that were masked by the leaves and unreacted from reacting with the UV now they are uncovered. This is simple, just rinse under a tap. Teabag paper is great for this it can take being run under a tap really well. If using normal paper to create a cyanotype it needs to be gently rinsed in a water bath. The rinsing reveals the blue colour almost like a magic trick!

Let it dry, the blues will become stronger.
Step 5
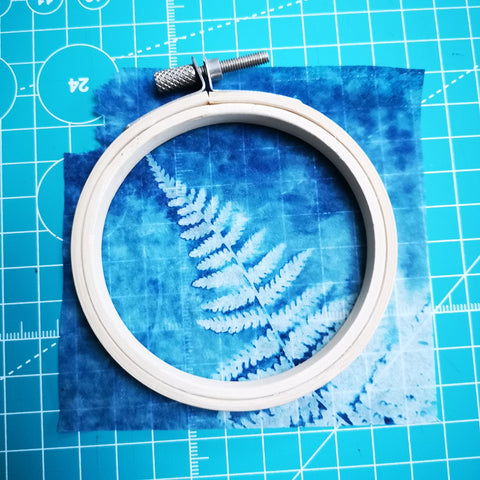
I ironed my print at this stage between the folds of a towel. Now we are ready to frame the print. Lay the print flat and use the embroidery hoop to choose a section you want from the print.

You'll need at least a centimetre extra around the edge of your chosen area so don't butt it right up to the edge. Cut a square around the hoop.
Step 6
Undo the fastening on the hoop and separate the two sections.

Lay you chosen square over the smaller hoop and ensure there's a little overhang of paper all the way around as this is what we need to trap the paper in place with.

Open the larger hoop just wider than the smaller hoop and carefully slide over the top being careful not to tear the paper with the metal rivets on the top edge.

Once in place tighten the screw fastening as tight as you can.

Step 7
Time to trim off the excess paper from the back as it will stop the hoop from laying flat and looks untidy. Flip the hoop over and with a sharp craft knife carefully cut against the frame. Don't push too hard or you'll leave marks. The teabag paper is only thin so won't need much cutting.


Step 8
Flip the hoop back over. Take a length of ribbon and tie around the fastening in a loop ready to be hung. This is where the teabag paper comes into it's own. The transparency of the paper let's the light through so that the cyanotype really glows.

If you fancy making your own framed cyanotype window hanger you can find teabag paper in my shop here or if you would prefer to buy one you can find some of mine in my shop here